How to export webpage to pdf using javascript, html2pdf, and jsPDF

Hustling around to simply export a webpage to a pdf file or do you just want to export something from your webpage to pdf and want a simple solution? You might get your answer here.
There can be two approaches to export a webpage to pdf
- Server Side PDF file generation
- Client(Browser) side PDF file generation
The server-side PDF approach is quite expensive and complex. you have to deal with HLL in that case like Java, PHP, Ruby, C#, etc. We will talk about the second approach here yes the client side PDF generation.
First, let’s understand the benefits here.
- All the computation to generate a pdf file will happen on the client machine, definetely it will be fast.
- The solution is very helpful when dealing with static website, not the web applications.
- Most of the the javascript libraries are opensource or github projects basically free!.
- Very simple to implement for basic requirements.
The above are some of the niche benefits, and of course, there are some loopholes as well, like encryption of the pdf export will be done at the client machine, there are chances hackers can get the encryption details, but wait a minute if your data is so secure, then you would choose a different solution to give users a readymade pdf from the server rather finding a workaround in their machine.
Let’s begin !!
Client-side pdf generation is all about browsers’ API calls, which Javascript and its related libraries consume to get things done. javascript is amazing, so do the capabilities it has. there are tons of javascript libraries which give such solutions. Let me list down some of them.
- jsPDF
- html2pdf
- pdfmake
- PDFsKit
- ReLaXed
- nodeice
- Electron
- PDFObject
- pdf2json
I got this list from a blog, you can check here. we are going to use jsPDF and html2pdf here for our example.
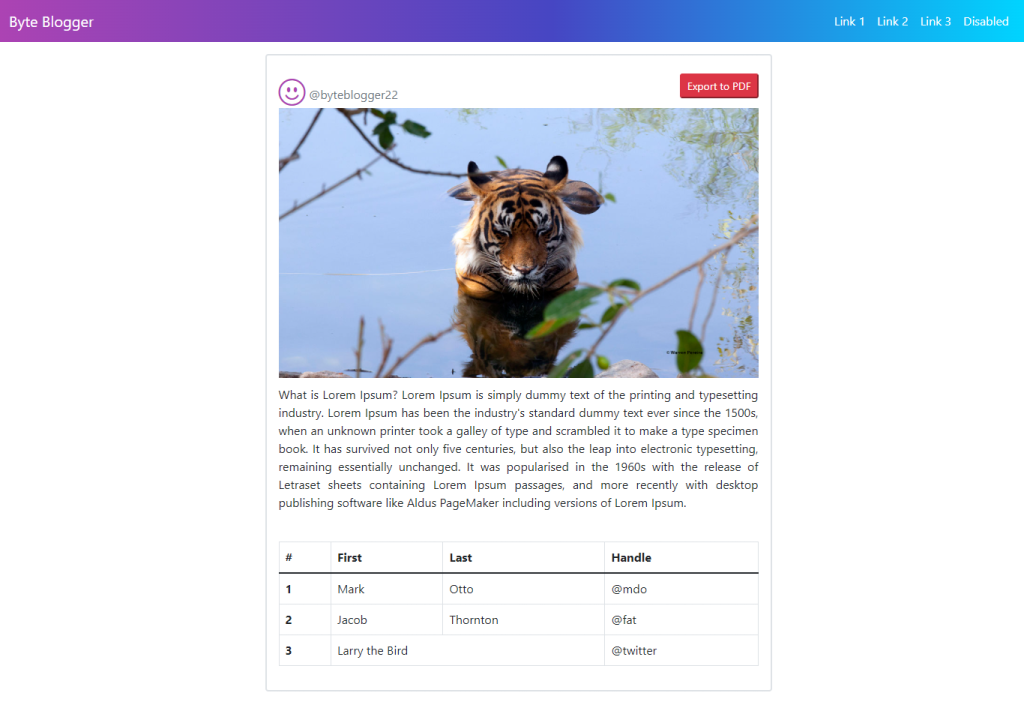
Above is the image of a static webpage we are going to use for our tutorial. It’s a simple webpage created using bootstrap 5.0. Let me sketch around this image and see the edited one below.
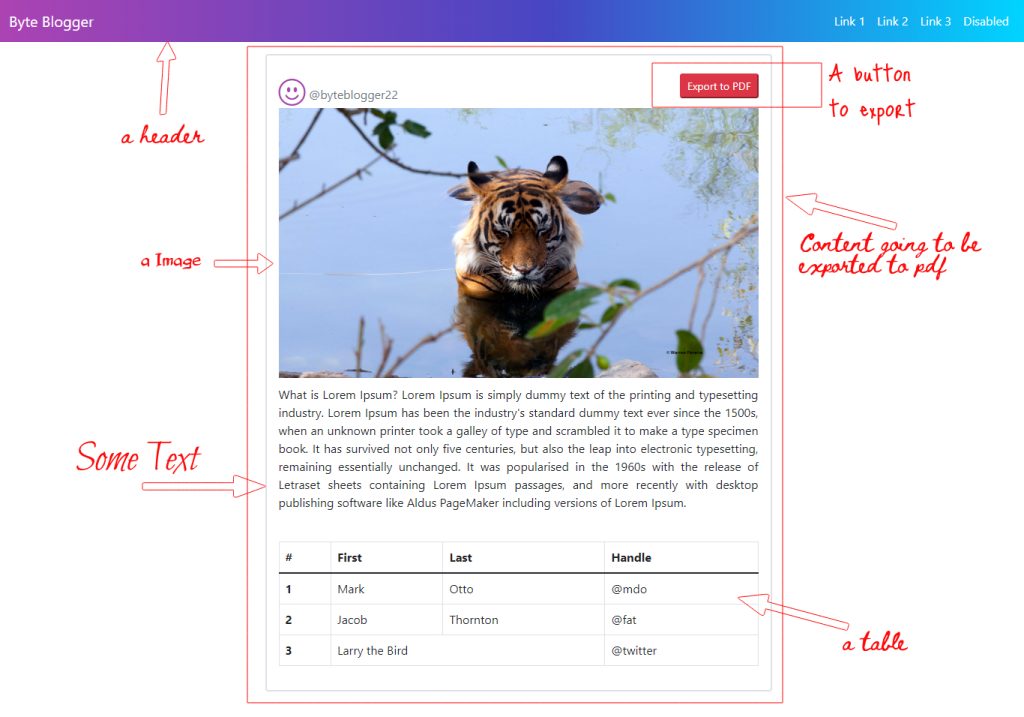
As you see above, we are going to export this grey bordered box out of the complete page. we have a header as extra on this page, you might have other things as well on your webpage which you don’t bother about, to get exported. All our focus is on the grey-bordered rectangle.
The content of this box mainly is three things- an Image, a text graph, and a table. how to draw this webpage anyway in the first place? well, check the index.html file code below, the main file we have.
<!DOCTYPE html>
<html lang="en">
<head>
  <meta charset="UTF-8">
  <meta name="viewport" content="width=device-width, initial-scale=1.0">
  <title>Web Page pdf export</title>
  <link href="style.css" rel="stylesheet">
  <link href="https://cdn.jsdelivr.net/npm/bootstrap@5.1.3/dist/css/bootstrap.min.css" rel="stylesheet">
  <script src="https://cdn.jsdelivr.net/npm/bootstrap@5.1.3/dist/js/bootstrap.bundle.min.js"></script>
  <link rel="stylesheet" href="https://cdn.jsdelivr.net/npm/bootstrap-icons@1.3.0/font/bootstrap-icons.css">

  <script src="https://cdnjs.cloudflare.com/ajax/libs/jspdf/1.5.3/jspdf.min.js"></script>
  <script src="https://cdnjs.cloudflare.com/ajax/libs/html2pdf.js/0.9.3/html2pdf.bundle.min.js"></script>
</head>
<body>
<nav class="navbar navbar-expand-sm navbar-dark header">
  <div class="container-fluid">
    <a class="navbar-brand" href="#">
      Byte Blogger
    </a>
    <ul class="navbar-nav">
      <li class="nav-item">
        <a class="nav-link" href="#">Link 1</a>
      </li>
      <li class="nav-item">
        <a class="nav-link" href="#">Link 2</a>
      </li>
      <li class="nav-item">
        <a class="nav-link" href="#">Link 3</a>
      </li>
      <li class="nav-item">
        <a class="nav-link disabled" href="#">Disabled</a>
      </li>
    </ul>
  </div>
</nav>
<div class="container-fluid">
  <div class="row">
    <div class="col-sm-3"></div>
    <div class="col-sm-6" id="divToExport">
      <div class="border border-2 rounded p-3 my-3">
        <span class="text-muted float-start"><i class="bi bi-emoji-smile icon-size"></i> @byteblogger22</span>
      <span class="float-end pt-2">
        <button type="button" onclick="generatePDF()" class="btn-sm btn-danger pull-right">Export to PDF</button>
      </span>
      <br>
      <img src="image-1.jpeg" class="img-fluid"/>
        <p class="paragraph">
          What is Lorem Ipsum?
Lorem Ipsum is simply dummy text of the printing and typesetting industry. Lorem Ipsum has been the industry's standard dummy text ever since the 1500s, when an unknown printer took a galley of type and scrambled it to make a type specimen book. It has survived not only five centuries, but also the leap into electronic typesetting, remaining essentially unchanged. It was popularised in the 1960s with the release of Letraset sheets containing Lorem Ipsum passages, and more recently with desktop publishing software like Aldus PageMaker including versions of Lorem Ipsum.</p>
<br>
        <table class="table table-bordered">
          <thead>
            <tr>
              <th scope="col">#</th>
              <th scope="col">First</th>
              <th scope="col">Last</th>
              <th scope="col">Handle</th>
            </tr>
          </thead>
          <tbody>
            <tr>
              <th scope="row">1</th>
              <td>Mark</td>
              <td>Otto</td>
              <td>@mdo</td>
            </tr>
            <tr>
              <th scope="row">2</th>
              <td>Jacob</td>
              <td>Thornton</td>
              <td>@fat</td>
            </tr>
            <tr>
              <th scope="row">3</th>
              <td colspan="2">Larry the Bird</td>
              <td>@twitter</td>
            </tr>
          </tbody>
        </table>
      </div>
    </div>
    <div class="col-sm-3"></div>
  </div>
</div>
<script type="text/javascript">
  function generatePDF() {

        // Choose the element id which you want to export.
        var element = document.getElementById('divToExport');
        element.style.width = '700px';
        element.style.height = '900px';
        var opt = {
            margin:       0.5,
            filename:     'myfile.pdf',
            image:        { type: 'jpeg', quality: 1 },
            html2canvas:  { scale: 1 },
            jsPDF:        { unit: 'in', format: 'letter', orientation: 'portrait',precision: '12' }
          };

        // choose the element and pass it to html2pdf() function and call the save() on it to save as pdf.
        html2pdf().set(opt).from(element).save();
      }
</script>
</body>
</html>
*{
font-family:"Segoe UI",Arial,sans-serif
}
.header
{
background: rgb(172,67,179);
background: linear-gradient(90deg, rgba(172,67,179,1) 0%, rgba(70,70,195,1) 54%, rgba(0,212,255,1) 100%);
color: #ffffff !important;
}
.icon-size
{
font-size: 36px;
color: rgb(172,67,179);
}
.nav-link
{
color: #fff !important;
}
.paragraph
{
padding-top: 10px;
text-align: justify;
display: block;
}Let’s understand this index.hml code.
Line 7-13: Integration of all important CDNs
  <link href="style.css" rel="stylesheet">
  <link href="https://cdn.jsdelivr.net/npm/bootstrap@5.1.3/dist/css/bootstrap.min.css" rel="stylesheet">
  <script src="https://cdn.jsdelivr.net/npm/bootstrap@5.1.3/dist/js/bootstrap.bundle.min.js"></script>
  <link rel="stylesheet" href="https://cdn.jsdelivr.net/npm/bootstrap-icons@1.3.0/font/bootstrap-icons.css">

  <script src="https://cdnjs.cloudflare.com/ajax/libs/jspdf/1.5.3/jspdf.min.js"></script>
  <script src="https://cdnjs.cloudflare.com/ajax/libs/html2pdf.js/0.9.3/html2pdf.bundle.min.js"></script>
Firstly integrate a stylesheet file style.css, where you want some look and feel tweaks in CSS, then I added Bootstrap CSS bundle and bootstrap js library CDNs, just for better webpage creation. bootstrap things are totally optional, depending on what design you have. want to learn the basics of the Grid system and design concepts in bootstrap 5, check W3schools. Line 12 and 13 are important, here we are integrating cdns of jsPDF and html2pdf libraries.
Line 40-82: The Div(Content) to be exported
In our code, from line 40-82 is the <div> element code, where we have to design the grey-bordered central element which has to be exported to pdf. you can code anything in this div but the most important part is the div id or I would say element id, which will be a reference to the pdf generation code for the html2pdf library.
Line 44: Export to PDF Button
Check this line 44, I know a simple HTML button with some bootstrap classes on it, but rather more important is the function we are calling here, yes onclick=”generatePDF()” parameter. we are calling a javascript function here on the click event of this button generatePDF() function is the crux of this blog and the core of our example, let’s check the code.
Line 86-104: generatePDF() function
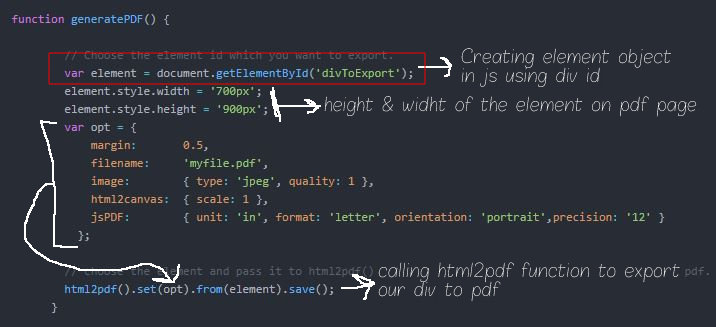
The image above is explaining things itself, I will explain the html2pdf() function call and opt variable.
opt variable holds all the values which are defining the configuration of a pdf file. margin, of course, the page margin we need on each pdf page, the filename is the name of the exported pdf file. image is an important parameter of the opt object.
html2pdf library uses the html2canvas library to paint an image on the webpage as a screenshot on the pdf page. important to note here you can export only “jpeg”, “png” and “webp”(chrome) images, check here.
html2canvas object is passed with scale parameter, which generates pdf based on browsers device pixel ratio. check the parameters here we can pass in this object.
jsPDF object, here we are passing dimensions of the pdf page, the format of the page, precision, and the measurement units, like in “mm”, “in” or “px”. this object will be passed to the jsPDF library to setup the pdf page. check the complete list of parameters here.
A final call to the html2pdf() function. here we have to call multiple worker API library functions) to achieve our goal. the flow basically goes like this-
.from() -> .toContainer() -> .toCanvas() -> .toImg() -> .toPdf() -> .save()We have to call all the functions in this order. if you want a page setting of a pdf, call the set() function on a from() function and pass the opt object and at last we have to call save() function to save our pdf file.
In our generatePDF() function line 102 can be simply html2pdf().from(element).save() , then it will set all the page setting to default for pdf, default layout is portrait scaling is one, margin is 1 and element will be left aligned.
I hope the tutorial would help you to achieve your end result.
Keep reading, Keep sharing!